
Onboarding Personal Users
0. Prerequisites
Create your developer account
You will need an active developer account to use Astra's sandbox API.
Sign up and generate API keys
- If you haven't already, browse to our Sandbox Dashboard.
- Enter your email and set a password.
- Enter your first and last name and agree to our Developer Policy and Terms of Service.
- When you click
Create Accountyou will be taken to the Dashboard panel. - On the Dashboard panel fill out the two required fields to generate your application's
client_idandclient_secret:- Name of your application
- Add a support email or URL
- Redirect URI for your application (you can change this value any time via the Dashboard)
- Click the Save Changes button at the bottom of the page. The page will refresh and reveal a new Keys section which will contain the Client ID and Client Secret for your application.
You now have an active developer account. You can always log into this dashboard again using your email address and password.
You may always return to the dashboard to access your keys.
Note that Redirect URIs are used to guide Users back to a specific page in your application after exiting our SDK. You may register multiple Redirect URIs through your Developer Dashboard, but it's important to note that Redirect URIs must remain consistent in OAuth URLs when an end-user is navigating through our SDK.
1. Create a User Intent
The creation of a User Intent involves providing specific information for an individual.
A real phone number or a Sandbox Test Phone number can be used when creating the User Intent.
We recommend using Sandbox Test Phone numbers if you plan on testing the onboarding flow more than 5 times in the same hour for the same phone number. Using a real phone number for multiple attempts in a short period of time may result in that real phone number being blocked by our phone auth provider for up to 24 hours.
Enable Sandbox Test Phone Numbers
- Navigate to the Astra Sandbox Dashboard
- Scroll down to the
Sandbox Settingssection. - Click the
Enable Phone Numbers For Testingtoggle. - Click the
Save Changesbutton at the bottom of the screen.

❗The User Intent creation request can be found at:Create User Intent
Example User Intent Request
The following example User Intent Payload can be used for testing purposes once YOUR_PHONE and YOUR_EMAIL are replaced.
We recommend using one of the Sandbox Test Phone Numbers to replace YOUR_PHONE.
We recommend replacing YOUR_EMAIL with an email address that you own that can receive mail.
Basic Authorization secures this endpoint.
The
authorizationheader contains the base64 encoded string of:YOUR_CLIENT_ID:YOUR_CLIENT_SECRETThe values for
YOUR_CLIENT_IDandYOUR_CLIENT_SECRETcan be found under theKeyssection of the Astra Dashboard
curl --request POST \
     --url https://api-sandbox.astra.finance/v1/user_intent \
     --header 'accept: application/json' \
     --header 'authorization: Basic MTIzOmFiYw==' \
     --header 'content-type: application/json' \
     --data '
{
  "first_name": "Edmund",
  "last_name": "Hillary",
  "date_of_birth": "1985-02-03",
  "ssn": "1234",
  "phone": "YOUR_PHONE",
  "email": "YOUR_EMAIL",
  "address1": "123 Astra Ave",
  "city": "Palo Alto",
  "state": "CA",
  "postal_code": "94304",
  "ip_address": "192.0.2.0"
}
'
Example User Intent Response
An id will be returned when submitting a User Intent. This is the user_intent_id.
{
  "id": "b020bff58ff3479ba5cb7e31a858d910"
}
2. Onboard the User Intent
Shortly after the User Intent is created, a User Intent Updated Webhook will be sent.
Take the user_intent_id and ensure the User Intent status is approved via: GET User Intent Details
After confirming the User Intent Status is approved you can use it to onboard the individual.
Overview
Onboarding a personal User involves four key steps:
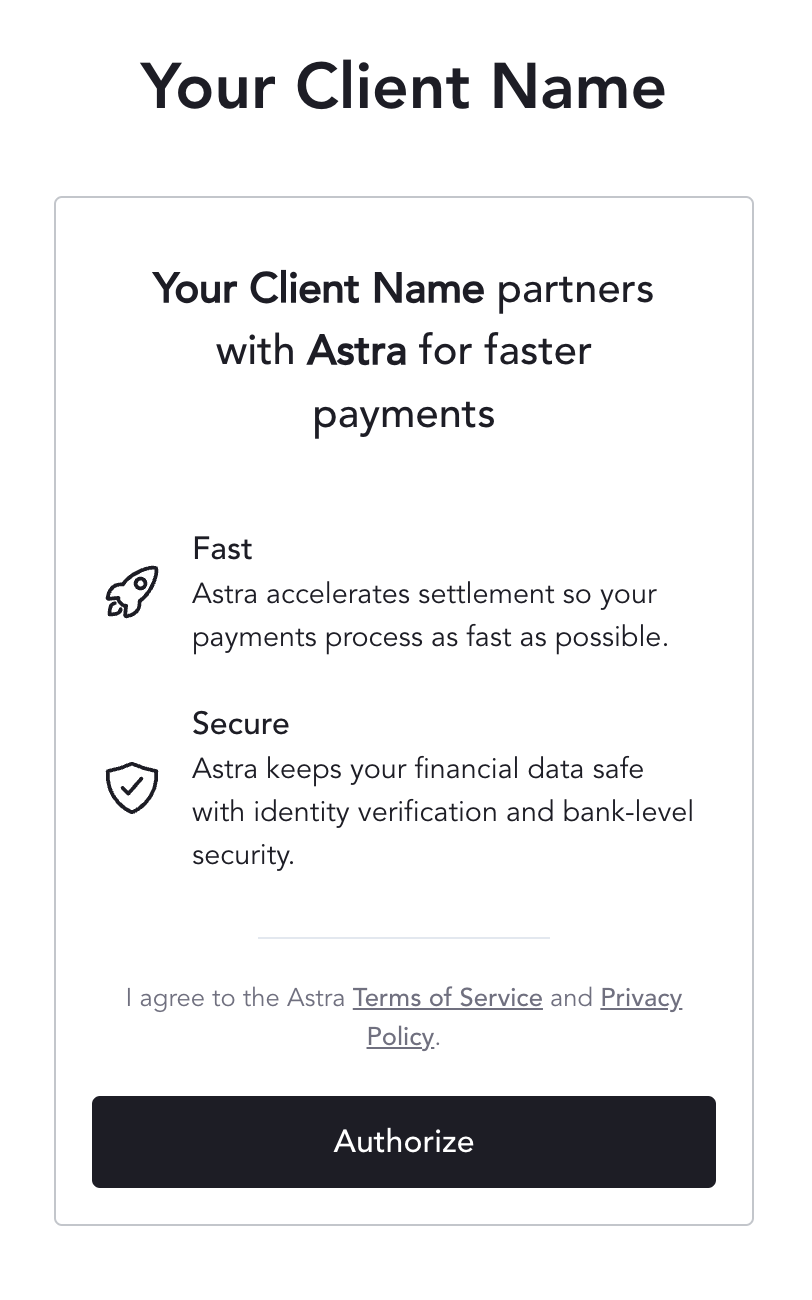
- Authorization: The Personal User accepts Astra's Terms of Service and Privacy Policy.
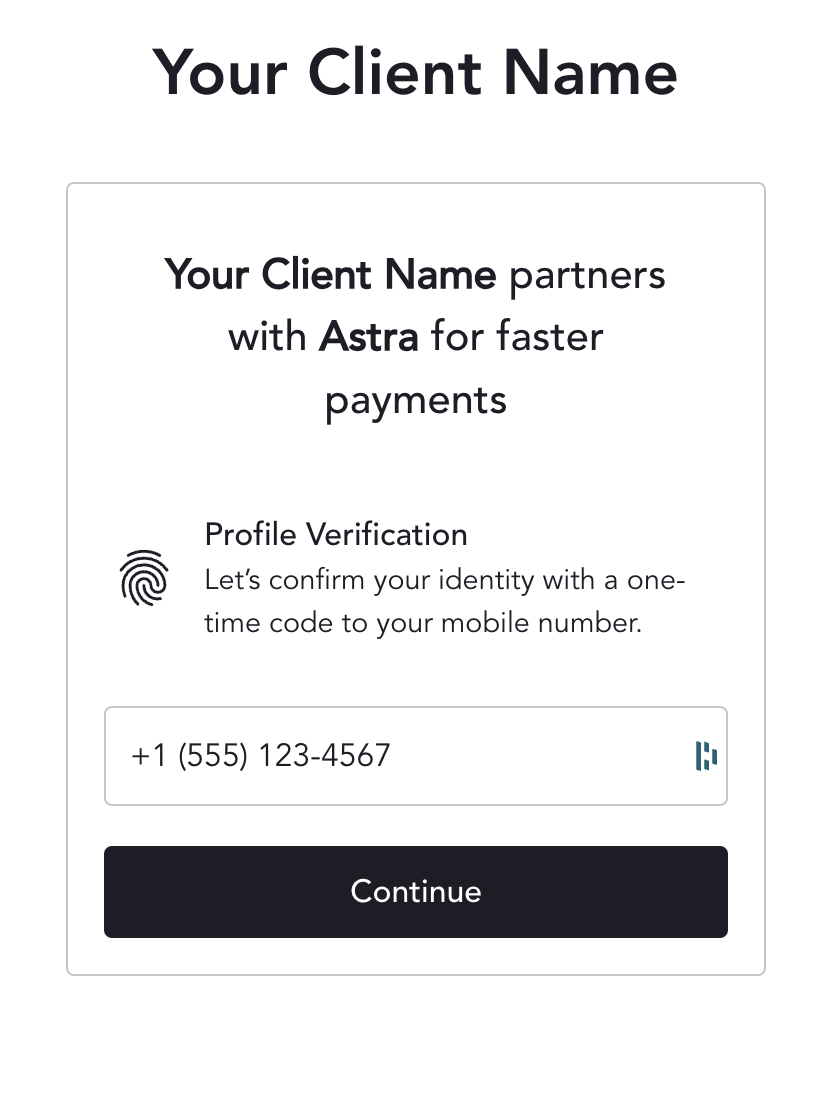
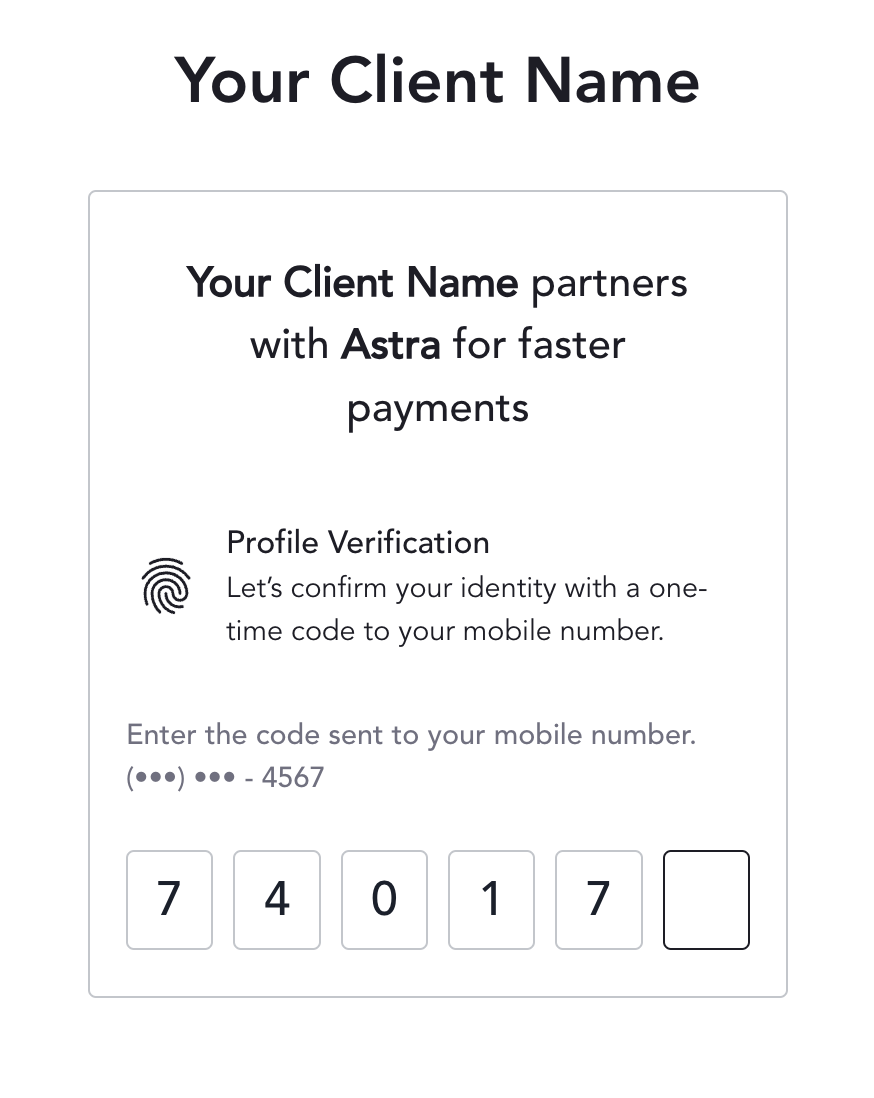
- Authentication: The Personal User authenticates by verifying ownership of their provided phone number (via SMS OTP / Phone 2FA).
- Collecting Authorization: Your application collects authorization (either
authorization_codeortoken(session token) depending on the onboarding option chosen). - Exchanging Authorization for Access Tokens: Exchange authorization for an
access_tokenandrefresh_tokenpair for the User.
Options
Astra Web App SDK
Astra offers an out-of-the-box solution for onboarding a personal user. The Astra Web SDK can be embedded within an iFrame in your application.
There are two options for invoking the Astra Web SDK:
- Via SDK URL
- Via Javascript initialization
If we were to use option #1, the SDK URL, from the linked documentation we will utilize the user_intent_id together with the Collect Authorization action to build the SDK URL for this individual (we recommend using the SDK Generator to generate the SDK URL, after which you can copy it and open in a separate browser tab):
Table of SDK Query Parameters
| Parameter | Required | Description |
|---|---|---|
| client_id | required | Your Developer Client ID |
| redirect_uri | required | The redirect URI for your Client (this must match your Developer Account settings) |
| response_type | required | The type of response after successful authorization (must be code) |
| user_intent_id | optional | The ID of the User Intent (when included the User can bypass manually entering profile details) |
| user_id | optional (required after successful onboarding) | The ID of the User |
| phone | optional | The User's phone number, to prefill the phone number field (10 digit format 5557771234) |
| phone_read_only | optional | Optionally lock the phone number field (only include if set to true) |
| state | optional | A custom query string. Could be used as a parameter to pass through to a redirect URI to better control the UX navigation. |
| bypass_connect | optional | Optionally skip the connect accounts screen (only include if set to true) |
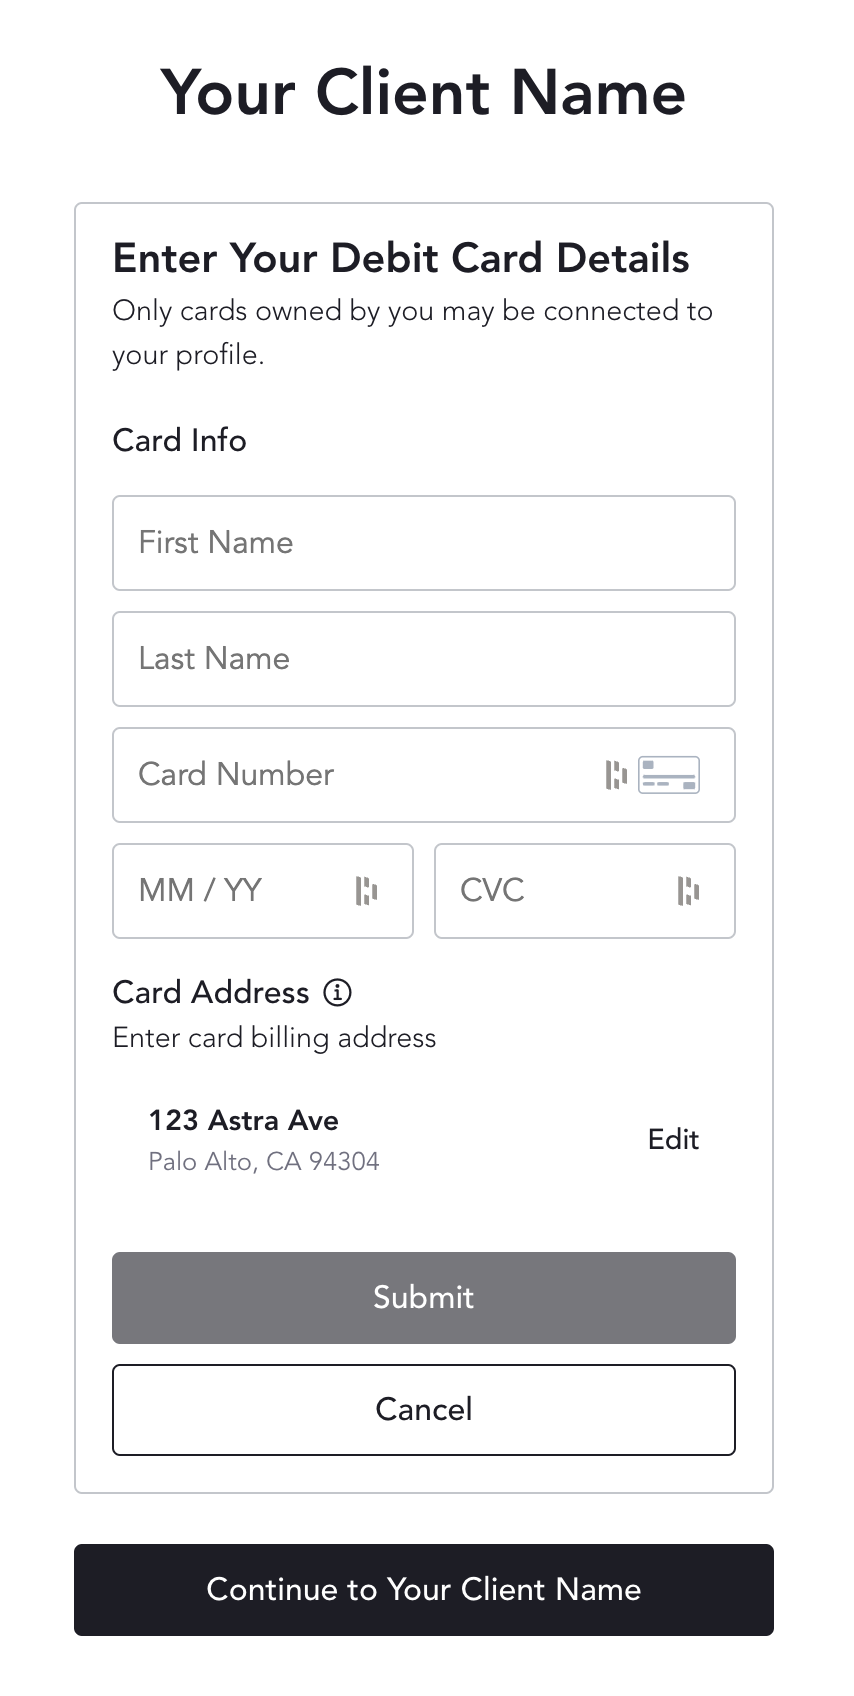
| debit_direct | optional | Optionally skip the Connect New Debit Card screen and go right to the Enter Your Card Details form. This parameter permits users to enter one debit card. After submitting the card details, the user is immediately navigated to the next screen. For debit enabled clients only. (only include if set to true) |
| session_token | optional | Optionally bypass the phone OTP by passing in the token generated from https://docs.astra.finance/reference/post_v1-partner-identity-verification |
Collect Authorization SDK URL
https://app-sandbox.astra.finance/login/oauth/authorize?client_id=your_client_id&redirect_uri=your_redirect_uri&response_type=code&user_intent_id=your_user_intent_id&phone=10_digit_phone&phone_read_only=trueThe above SDK URL's query parameters are populated with values relating to your Astra Developer Client and the onboarding User.
The Astra Web App SDK
The first screen the individual will see is the Authorization screen. On this screen the individual is presented with Astra's Terms and Conditions and Privacy Policy. Here the individual is authorizing your client to act on their behalf in Astra.
The next screen the individual will see is the Authentication screens.
First a screen verifying their phone number.
Then a screen to enter an SMS OTP.
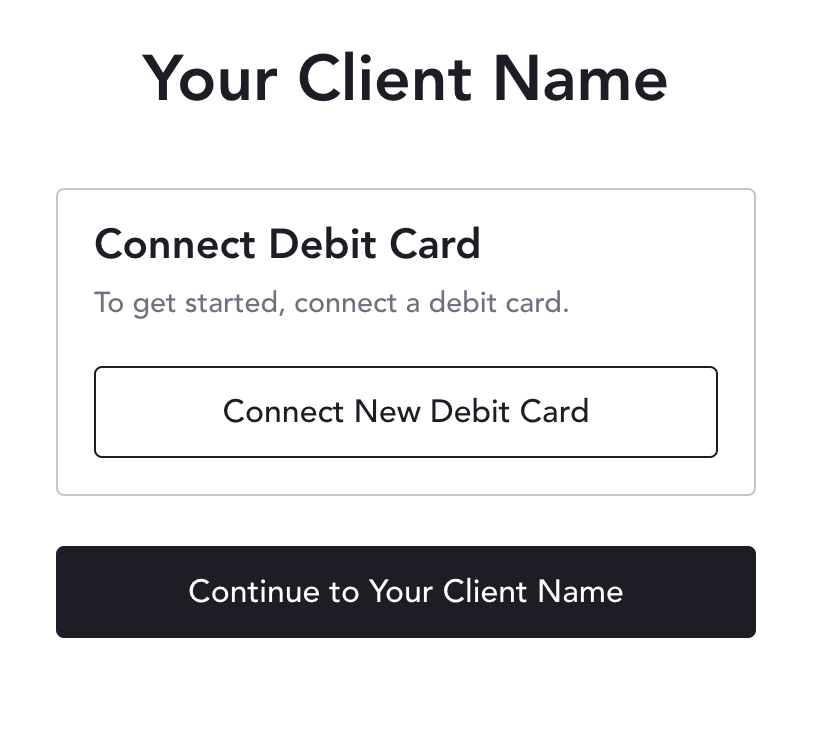
The option to add a card will be prompted if sending the user through the Link Card action, or during initial onboarding in the Collect Authorization action.
The individual will have the option to add a card, or skip adding a card.
Sandbox test card numbers are available here.
After successful Authorization and Authentication, on redirect to your specified refirect_uri, there will be an authorization_code available in the URL for your application to take and exchange for User tokens (access_token and refresh_token).
Example redirect : YOUR_CLIENT_REDIRECT_URI/?authorization_code=wxFRfKii1BPgrSqQs1CobMfXvD0arCujMDYuFQOCkbwBQLMH&code=wxFRfKii1BPgrSqQs1CobMfXvD0arCujMDYuFQOCkbwBQLMH
In the above example, wxFRfKii1BPgrSqQs1CobMfXvD0arCujMDYuFQOCkbwBQLMH is your authorization_code that you will exchange for User tokens at: Authorize a User.
The
authorization_codehas a short TTL and will expire in a few minutes.The same
redirect_urithat you specified in the Astra Web App SDK URL to generate theauthorization_codemust also be used in your request to Authorize a User.
Trusted Authentication
Astra offers Trusted Authentication as an option for certain clients to bypass the Authentication step highlighted above. If you're interested please review the following resource: Trusted Authentication
API Only
Building off of an existing Trusted Authentication integration, you can go a step further and have your client enabled for a full API integration. If you're interested please review the following resource: API Only Authorization
What's Next?
Once you've generated an access_token and refresh_token for a User, they are successfully onboarded to Astra!
With the access_token in hand, you can invoke various Astra API requests on behalf of the User.
3. Add Another Card
Adding a card to an Astra User is easy, and you have a few options at your disposal.
Once a card is successfully added, a persistent card object associated the User will be created in Astra. This persistent card object can be referenced via a unique card_id.
Sandbox test card numbers are available here.
Adding a Card via the Astra Web App SDK
Options
Astra Web App SDK
Astra offers an out-of-the-box solution for adding a card. The Astra Web SDK can be embedded within an iFrame in your application.
There are two options for invoking the Astra Web SDK:
- Via SDK URL
- Via Javascript initialization
If we were to use option #1, the SDK URL, from the linked documentation we will utilize the user_id together with the Link Card action to build the SDK URL for this individual (we recommend using the SDK Generator to generate the SDK URL, after which you can copy it and open in a separate browser tab):
The Astra Web App SDK
The first screen the individual will see is the Authorization screen. On this screen the individual is presented with Astra's Terms and Conditions and Privacy Policy. Here the individual is authorizing your client to act on their behalf in Astra.
The next screen the individual will see is the Authentication screens.
First a screen verifying their phone number.
Then a screen to enter an SMS OTP.
The option to add a card will be prompted if sending the user through the Link Card action, or during initial onboarding in the Collect Authorization action.
The individual will have the option to add a card, or skip adding a card.
Sandbox test card numbers are available here.
Link Card SDK URL
https://app-sandbox.astra.finance/cards/connect?client_id=your_client_id&redirect_uri=your_redirect_uri&user_id=your_user_id&phone=10_digit_phone&phone_read_only=trueAfter the card is successfully added, a card_created Card Webhook will be sent.
Details on enabling webhooks can be found here.
The card_created webhook will tell you that a card_id was created for a specific user_id. When your system receives the webhook we recommend fetching the specific card and storing the card_id in your system in association with the user_id.
Adding a Card via API
Astra offer the option to add add cards via API as well.
Note the
secureendpoint must be used when creating cards.https://secure.api-sandbox.astra.finance/v1/cards
Sandbox test card numbers are available here.
Do you want to add cards that you issue?Client-issued cards can be added to Astra by specifying
added_by_user: falsein the card creation API request.In addition, you'll also need to share your card BIN(s) with us.
4. Create a Card-to-Card Routine
A routine is a set of instructions on how to move funds. Card-to-Card routines provide instructions on how to move money from a source card to a destination card.
If a routine passes validation and starts processing, it will spawn a transfer.
The transfer will process the routine's instructions and attempt to move funds from the source card to the destination card.

Routine creation requires a User's access_token.
The routine creation API request can be found here.
For Me-to-Me routines, the payload is as simple as including the source and destination card_ids. See the example below for the minimum required fields:
For Peer-to-Peer Card-to-Card routines, the source card will always belong to the authenticating User (the authenticating User is the User that owns the access_token that is used in the Authorization header of the request). The destination_user_id will also need to be included in the request payload.
Example Card-to-Card Routine Request
curl --request POST \
     --url https://api-sandbox.astra.finance/v1/routines \
     --header 'accept: application/json' \
     --header 'authorization: Bearer access_token' \
     --header 'content-type: application/json' \
     --data '
{
  "type": "one-time",
  "payment_type": "debit",
  "name": "Phone Bill 020325",
  "source_id": "card_id_1",
  "destination_id": "card_id_2",
  "amount": 4.99
}
'
Example Routine Response
An id will be returned in the payload. This is the routine_id.
{
    "active": true,
    "amount": 4.99,
    "created": "2025-03-15T03:20:33.010178+00:00",
    "destination_id": "card_id_2",
    "destination_user_id": "authenticating_user_id",
    "id": "306489f0-d487-4026-8467-5634d680048a",
    "name": "Phone Bill 020325",
    "payment_type": "debit",
    "source_id": "card_id_1",
    "start_date": "2025-03-14",
    "status": "active",
    "type": "one-time"
}
The Transfer
When the routine creates its transfer, you will receive a transfer_created webhook.
Details on Transfer webhooks can be found here.
Details on enabling webhooks can be found here.
Grab the resource_id value from the transfer_created webhook payload and fetch transfer specific details here.
Alternatively, you can also fetch a User's recent transfers via the List Transfers API resource.
From the transfer details response payload, you can use the routine_id property to correlate the transfer back to the routine that created it.
When you receive a transfer_updated webhook, fetch the transfer specific details again. In sandbox, this next transfer update should result in a transfer with a status: processed.
Congratulations you've successfully onboarded your first Astra User and successfully created a transfer for them!
Navigate to the Users section of the Astra Dashboard and click on your User's user_idto view a list of their transfers and more!
Updated 6 months ago